Manage your project with Git for full version control
Good project management requires careful tracking of multiple entries by the project contributors. Git is a well-known version control mechanism to integrate into your production flow. Git was initially coded by Linus Torvalds, for his Linux kernel development, who was frustrated by other distributed version control systems. Git supports full-version tracking with history without requiring network access. Git has been adopted by many projects since 2005.
I found it very useful in my SoC projects. As you remember, I have my Arm IPs, some IPs (glue logic) and my custom IPs (my specific research) for integration. The project overview is in very basic form:
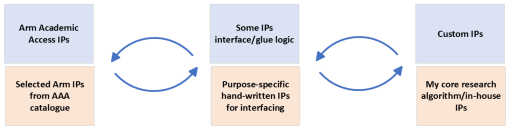
I want to keep the original AAA IP untouched but also want to easily use them. Purpose-specific hand-written IPs will also make my project simpler to develop, it may be a versatile, reusable IP block that I use over and over again. My core research algorithm for example, an ML vision real-time face-detection IP.
This means I have many components some of which I want to share, some of which I want to be untouched but keep functional. At this point, Git version tracking comes to the stage as a rising star. Firstly, I keep the arm-AAA-IPs folder which hosts my Cortex M and Corstone IPs isolated.
Symbolic links are great to use for this purpose. They will just be linked files or directories to show the location of the originals without tampering with them.
You can see your options on how to link the file with symbolic links:
$ln -s "source file/directory" "activated link name"
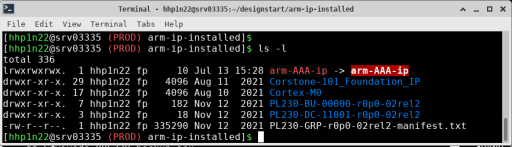
The new symbolic link should be visible now.
$ls
"arm-AAA-ip" symbolic link points to the precise location of the original Arm AAA IPs.
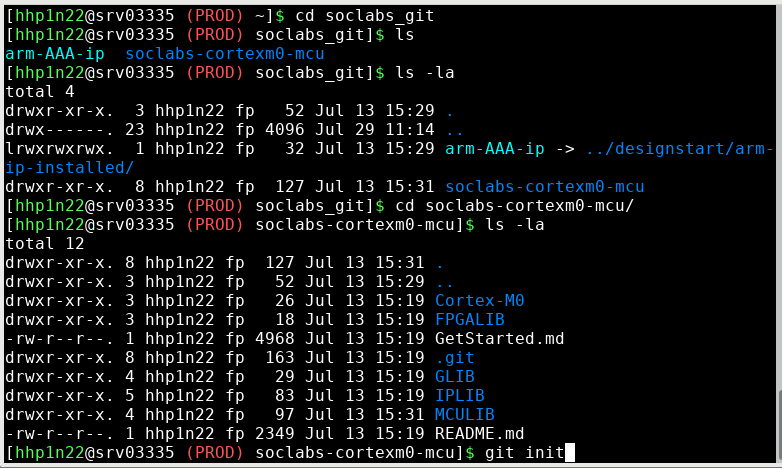
Now I can add all the current files that I would like to track and record at my git repo. Let's quickly initialise and add them.
$git init
$git add my_favorite_directory/readme.txt
$git add my_wrapper_hdl.sv
I can add more files and then comment on this bundle as one. Let's record these new additions with a meaningful comment for all.
$git -comment "First design entries"
Then I can just check what's just happened, and what's the status:
$git -status
The entire section below is very generic git installation management:
This guideline targets the Linux-based production system. My command examples use the Ubuntu-based package managers. They may change if you use a different Linux distro. Please notice that git commands are universal and applicable to any command line interface.
Please follow the steps for easy installation. If you don't remember some particular command, or would like to refresh your memory then the Quick Git Cheat Sheet at the end of this page should serve you well.
- What is a repository/ Git repo:
- STEP 1: Check if you already have a git installation on your system :
- STEP 2: Git Installation:
- STEP 3A: First time designating a new project from scratch - Option 1 : (This means you don't have a git project repository before and want to install it in your own directory)
- STEP 3B: First time contributing to an existing project - Option 2: (This means the project has a repository so you can start contributing to it. Option 1 users should skip this!)
- STEP 4: Common git steps (applies both Option 1 and Option 2):
- Quick Git Cheat Sheet:
What is a repository/ Git repo:
The repository (or Git repo) is a term that defines either a local or remote project directory structure that Git can access and perform operations on. Repositories can be made either public or private access. Git might be an open-source project itself but it doesn't imply your projects should be public. Repository management and maintenance is another topic. You may be using a server-based repository in your own university domain, or you may be using a web-based git repo service for example GitLab, GitHub, etc.
Step 1: Check if you have a git installation on your system already:
Git has been already installed in your production system if your Linux distro has it as a default. Please check it in your terminal as follows:
[user@hostname~]$git --version
[user@hostname~]$git version X.Y.Z
If you see nothing like the response or an error command not found, you need to install it. I used git version 2.31.1 which is the version that is used in my current project repositories.
Step 2: Git Installation:
It is quite straightforward to install by package managers such as Ubuntu
[user@hostname~]$ sudo apt-get install git
Please consult with your system administrator, if you would like to install it system-wide.
Setting up your working directory you need to decide what to share and what not to share in your git repository. You can define your details by typing:
[user@hostname~]$git config --global user.name "your_username"
git config --global user.email "your_email_address@examplemail.com"
Please check it has recorded your information correctly by typing:
[user@hostname~]$git config --global --list
After confirming that Git was installed the way you like, you can either define a project from scratch or clone an existing project from a git repository.
STEP 3A: First time designating a new project from scratch - Option 1 : (This means you don't have any git project repository before and want to install it in your own directory first)
Let's define a project from scratch that has no recorded repository by typing:
[user@hostname~]$git init
This command issues a new directory where we are. You can check your project working directory by typing:
[user@hostname~]$ pwd
Then please follow step 4 to complete your first git experience.
STEP 3B: First time contributing to an existing project - Option 2: (This means the project has a repository so you can start contributing to it. Option 1 users should skip this!)
Option 2 tells you how to install it for existing projects.
If the Git project has already been initiated and developed by other developers, then the first command would be useful to get the latest revision by downloading (a.k.a pulling) the repository.
[user@hostname~]$ git pull REMOTE name-of-branch
Now, please follow step 4 to complete your first git experience.
STEP 4: Common git steps (applies both Option 1 and Option 2):
The status is self-explanatory. It shows the existing project files and their change status.
[user@hostname~]$ git status
You can add a “remote” to tell Git which remote repository is linked to the specific local folder on your computer. The remote command tells Git where to push or pull from.
The "origin" is our remote repository. For example, a Gitlab repository can be added:
[user@hostname~]$ git remote add origin git@gitlab.com:username/projectpath.git
You can add your first project file(for example, test.html) into your git repository by typing:
[user@hostname~]$ git add test.html
You can add a comment on what you have done in this addition:
[user@hostname~]$ git commit -m "Added a test HTML file that contains some data which I can read through a browser"
If a remote repository is ready (we defined it as the origin above), the push command uploads and synchronises our local changes. We can push all our local changes to the remote server:
[user@hostname~]$ git push origin main
Now it's complete.
Git is a very powerful tool. It has more commands which reveal plenty of options for developers. I have just covered the basics here. If you would like to dive into it. Here is the quick Git cheat sheet that I have snapped from Atlassian.
Useful links: Git on the command line | GitLab
I hope Git helps you track your project. Please feel free to comment below. How did you find Git? How often do you use version checking in your projects? What would you like to know more about? Would you like us to cover public-private repositories for remote project management?
Many thanks,
Hakan
 Hakan Pekmezci
Enterprise Fellow
at University of Southampton
Research area: Design
Submitted on
Add new comment
To post a comment on this article, please log in to your account. New users can create an account.