






Verification Methodology
It is good practice for any SoC Labs project to have a defined Verification Methodology.
The SoC Labs approach: Verification reuse across the flow
Just as with the Design Methodology SoC Labs encourages re-use of verification assets at every stage of the design flow. The principle is simple: the intent of a verification check should stay the same as the design moves through the flow, even though the means of applying it changes.
The same functional feature — say, a DMA burst transfer, or an interrupt latency bound — should be checked at RTL simulation, again at gate-level simulation, again on FPGA prototype, and again at post-silicon bring-up.
What changes between stages is the execution environment (simulator vs FPGA vs bench equipment) and the level of visibility you have into the design (full signal visibility in RTL sim, more limited at post-silicon).
What should not change is the reference model, the test intent, and ideally the stimulus itself.
In practice this means investing early — at Architectural and Behavioural stages — in a Golden Reference Model and a stimulus/checking strategy that can be retargeted rather than rewritten as you move from RTL → Gate → FPGA → Silicon. This is the same principle behind Accellera's Portable Stimulus Standard (PSS) - see below for more detail.
To support this approach SoC Labs reference designs are developed along with baseline verification infrastructure — so project-specific testing can build on a shared, reusable core rather than starting from zero.
Choosing a Methodology
Methodologies range from highly formal to more agile approaches. SoC Labs' position is not to mandate a single methodology but it is important to make active, documented (in your project milestones) decisions on the approach for your project. The key even if using a less formal methodology is to define clearly how you plan to verify your System on Chip design. The right choice depends on IP complexity, team size, and reuse needs.
Common industry approaches include:
Universal Verification Methodology
Universal Verification Methodology (UVM) is a defined standard to create a modular reusable generic verification environment. It aims to reduce the effort of reusing IP by making it easier to reuse verification components.
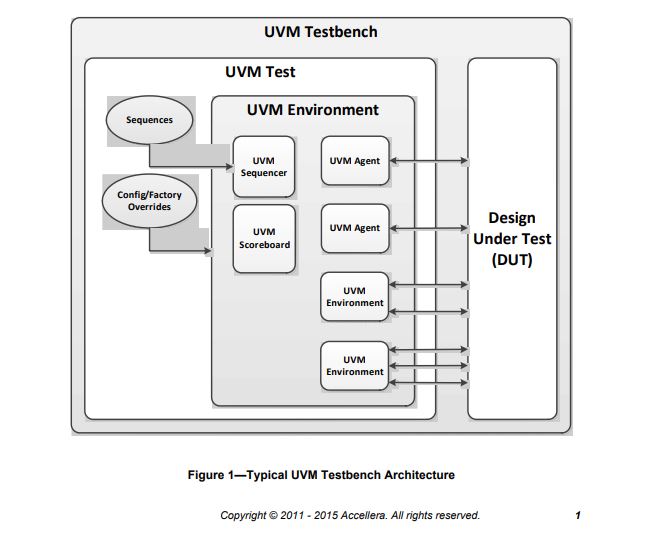
UVM provides an architectural framework and class libraries for establishing verification environments for a Design Under Test (DUT). A Testbench is a flexible way to create a structured approach to verify IP. It instantiates the IP as a DUT and Test which contains a set of configured verification components and applies sequences of transactions to the DUT. The verification environment for a SoC will contain a hierarchy of Environment components with typically one per IP component. An Agent within the Environment manages a stimulus flow of transaction that are applied to the DUT. Within the Agent transactions from a Sequencer are past to a Driver that converts the transaction-level stimuli into pin-level stimuli and probe the DUT interface with drive signals. A Monitor captures the output of the DUT and converts the pin-level activity to transactions which are passed into the verification environment for analysis. A Scoreboard uses a reference model to check the behavior of DUT comparing the actual and expected transactions flowing through the various Agents.
UVM provides a level of abstraction to the verification process using Transaction Level Modeling (TLM) and also allows for mixed-language verification environments. While the UVM provides an interoperable standard for creating components within a verification environment there are still different implementation choices which need to be considered at each stage of the SoC project.
While IEEE 1800.2-2020 describes UVM in terms of SystemVerilog, the same architecture isn't tied to one language — see "pyuvm / cocotb" below for a Python-based route to the same concepts.
pyuvm / cocotb
While IEEE 1800.2-2020 defines UVM in terms of SystemVerilog, nothing about the architecture requires that specific language — as with any object-oriented design pattern, it can be implemented in any form with sufficient OO support. pyuvm is one such implementation, built in Python, it implements a significant portion of the 1800.2 standard, including the full UVM Transaction Level Modeling (TLM) system. It uses a second Python framework, cocotb, to interact with simulators and schedule simulation events, supporting both open-source tools, such as Verilator, and industry-provided EDA tools.
cocotb is a free, open-source testbench framework that lets you write verification code entirely in Python while it drives an HDL simulator underneath. The Design Under Test (DUT) is instantiated directly in the simulator, with no special wrapper RTL required. Instead of the clock-cycle-by-clock-cycle style of a traditional testbench, cocotb tests are ordinary Python async functions: the test awaits an event — such as a rising clock edge — and the simulator resumes running until that event occurs, then hands control back to your Python code. This means you can write stimulus generation, checking, and even data analysis using the full Python ecosystem (NumPy, pandas, etc.) rather than being restricted to what a hardware description language offers. cocotb works with a wide range of simulators and commercial EDA tools. It is a good choice if your team is comfortable in Python, or you're license-constrained.
pyuvm provides the actual UVM class library — uvm_component, uvm_agent, uvm_driver, uvm_monitor, uvm_scoreboard, the factory, the phasing system - so the architectural concepts from UVM (Testbench, Agent, Driver, Monitor, Scoreboard) transfer directly; only the syntax changes. Because Python doesn't require strict typing or parameterised classes, some of the boilerplate that trips up UVM newcomers in SystemVerilog is avoided in pyuvm.
Formal / assertion-based verification (SVA)
Everything described above, UVM and pyuvm, are simulation-based: you generate stimulus, drive it into a design, and check the response. Formal verification takes a fundamentally different approach: instead of simulating specific input sequences, a formal tool uses mathematical proof techniques to check whether a property can ever be violated by any possible sequence of inputs. This means formal verification can find corner-case bugs that would be extremely hard to hit by chance in simulation, and, for smaller properties, can prove their absence rather than just failing to find them.
The properties themselves are written as SystemVerilog Assertions (SVA), part of the IEEE 1800 SystemVerilog standard. An assertion is a concise, machine-checkable statement of expected behaviour — for example, "a request must be followed by an acknowledge within 4 clock cycles" or "these two control signals must never both be high at once." Assertions come in two flavours: immediate assertions, which check a condition at a single point in simulation time (similar to a software assert), and concurrent assertions, which describe behaviour over multiple clock cycles using sequence and temporal operators, and which are what formal tools reason about.
Formal verification is particularly effective for control logic, bus protocol compliance, and clock-domain-crossing (CDC) checks, where the state space is well-bounded, and is normally used to complement rather than replace a simulation-based UVM or pyuvm/cocotb environment, not compete with it.
Directed / self-checking testbenches
Not every block may require a full UVM/pyuvm environment. For small IP blocks and specifically for early early design exploration, or a first pass before a reusable environment is constructed, a directed, self-checking testbench is a legitimate and widely-used approach.
The idea is simple: you write specific test cases by hand ("directed" — as opposed to UVM's randomised/constrained stimulus), apply them to the DUT, and add a checker in the same testbench that automatically compares the output against the expected result ("self-checking" — as opposed to a human reading waveforms). This is usually the first verification style anyone learns, and it remains a sensible choice when:
the block is simple enough that hand-written cases give adequate coverage,
you need a fast result for a prototype design as part of a potential design exploration, this is usually before it is worht investing in reusable infrastructure,
the block is unlikely to be reused, so the upfront cost of a UVM/pyuvm environment isn't justified.
The trade-off is that directed tests don't scale well to complex IP and full SoCs. As the number of interacting features grows, the number of hand-written cases needed to cover them grows much faster, and coverage gaps are easy to miss. This is exactly the problem UVM's randomisation and coverage-driven approach is designed to solve. A common and sensible path is to start with a directed, self-checking testbench for early bring-up, then migrate to UVM or pyuvm/cocotb once the block's interfaces stabilise and reuse across the project (or across projects) becomes valuable.
Portable Stimulus (PSS) - reuse across the whole flow
The SoC Labs re-use principle described above, write verification intent once, and reuse it across RTL simulation, gate-level simulation, FPGA prototyping, and post-silicon, it also the principle behind the Portable Test and Stimulus Standard (PSS), developed by the Accellera Systems Initiative (the same body behind UVM).
Where UVM, pyuvm, and SVA are all about how you build a testbench and what you check for at a given stage, PSS addresses a different problem. A verification team often has to rewrite their tests from scratch as a design moves from simulation, to emulation, to an FPGA prototype, to real silicon on the bench, because each stage has completely different tools and levels of visibility. PSS lets you describe verification intent — the actions, data, and resource dependencies that make up a test scenario once, in an abstract declarative form, and then have that single specification retargeted to generate the actual test implementation appropriate to the execution environment for each design phase.
The practical takeaway is: PSS is not a replacement for UVM, pyuvm, or SVA — Accellera describes it explicitly as a complement to UVM — but it is the standardised industry expression of exactly the philosophy SoC Labs is asking projects to adopt. You don't need to adopt PSS tooling to follow the SoC Labs re-use principle (a well-structured Golden Reference Model and disciplined test planning gets you most of the way), but it's a good reference point if you want to see how the wider industry has approached the same problem formally.
Explore This Design Flow


Projects Using This Design Flow
Experts and Interested People
Members




Related Project Milestones
| Project | Name | Target Date | Completed Date | Description |
|---|---|---|---|---|
| Aspen: A 630 FPS Real-Time Posit-Based Unified Accelerator for Extended Reality Perception Workloads | Universal Verification Methodology (119) | |||
| An Efficient Hardware-based Spike Train Repetition for Energy-constrained Spiking Neural Networks | Verification Methodology (119) |
OverviewThe verification strategy for the SNN IP is divided into two primary phases:
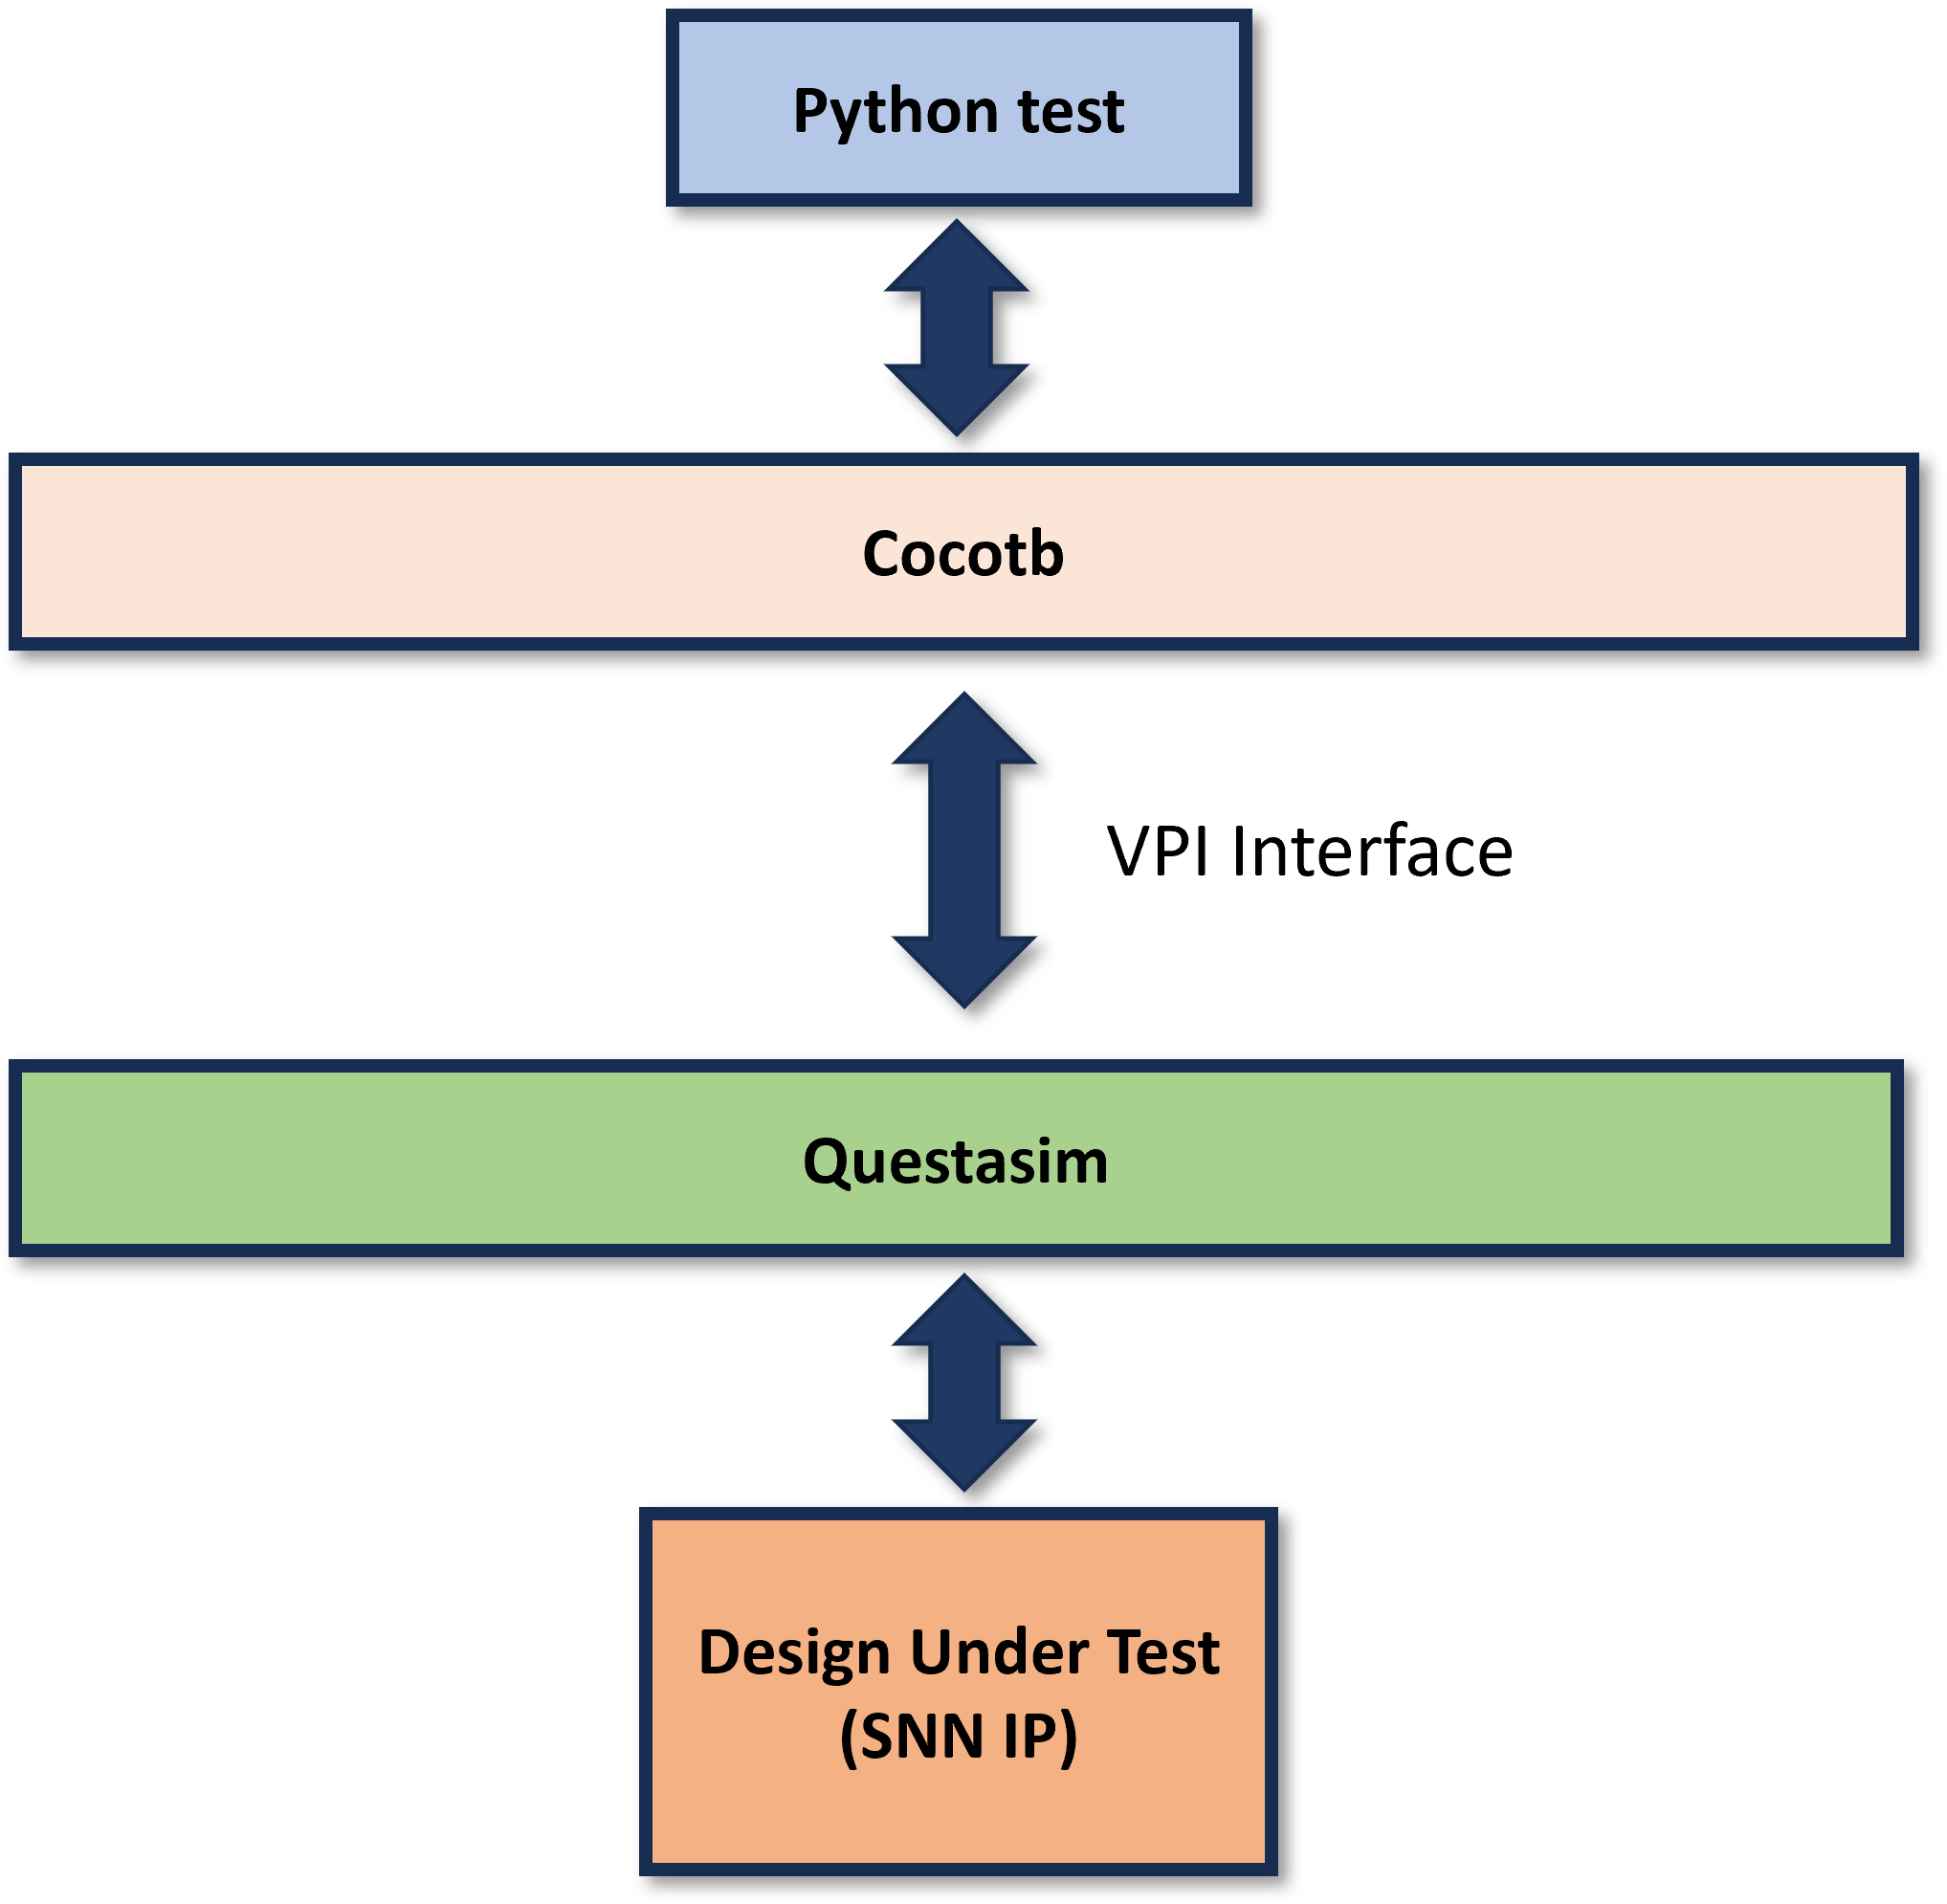
Interface Verification with CocotbTo ensure the SNN IP’s AHB interface strictly adheres to bus protocols, we employ a Cocotb-based co-simulation stack as illustrated in the architecture diagram:
Figure 1. Cocotb testbench architecture System-Level Simulation with socsim and DMA PL230To verify the SNN IP’s performance and its interaction with other SoC components, we perform full-system simulation using the socsim tool provided by SoCLab.
|
||
| DRAM Controller integration in megaSoC | Verification Methodology (119) | |||
| AHB eXcecute in Place (XiP) QSPI | Verification Methodology (119) |
Verification uses multiple QSPI models as the VIP (micron model and microchip model) |
Comments
Brilliant Milestone report for this stage
What a brilliant Milestone report from The Anh Nguyen for the project An Efficient Hardware-based Spike Train Repetition for Energy-constrained Spiking Neural Networks. It really brings to life the generic information we have in this stage page.
The page could now do with some more SoC Labs reference design specific implementation material to do the same and make the flow step grounded in the specific SoC designs we have here within SoC Labs.
John.
Reference design grounding
Good call on the reference design grounding — I'll add a section that ties the reuse principle to verification methodologies used in our reference designs.
Portable Stimulus Standard
I hadn’t actually heard of PSS before so that’s really interesting to hear something exists on this front and I think this tackles one of the main problems problems we have when transitioning between implementation. Building this stimulus set, especially around our SoCs and custom accelerators is going to become increasingly important, especially on megaSoC when moving from simulation to FPGA/HAPS based validation.
Really interesting read, I will need to look to see how we can adopt this on nanoSoC.
Verification Methodology for nanoSoC v3
David,
Just following up on this. Have you had chance to consider the Verification Methodology for nanoSoC v3?
John.
Add new comment
To post a comment on this article, please log in to your account. New users can create an account.